Why use WordPress?
WordPress is a free content management system and an open source blogging tool that has a massive amount of capabilities. Whether you’re a huge company like CNN or PlayStation, or just someone wanting to start a personal blog, WordPress has the features you need to get a website up and running within minutes. It’s safe, secure, and exceptionally user friendly. You don’t have to be a web designer or know how to code to get a website up and running!
However, setting up a WordPress site, or even a website in general, can be a little confusing to some newcomers looking to build their first website. There are many articles out there you could simply Google in regards to setting up your first WordPress site, but a lot of them are outdated and are no longer relevant. This article will illustrate a step-by-step solution to setting up your very own WordPress website using Bluehost.
Why use Bluehost for WordPress Hosting?
There are thousands of web hosts out there on the market today, so how does Bluehost stand out from the rest? Here are a few reasons to consider Bluehost over other providers you might find on the internet:
- You get a free domain name for life. Most providers will charge you an extra price annually or even quarterly for registering new domain names. Bluehost provides a complimentary domain name within their extremely competitive price, which brings me to my next point.
- For an amazingly low price of $4.95 per month you can get a hosting that provides unlimited storage, email accounts, bandwidth, automated back-ups, and many more feature rich services.
- Bluehost also offers 24/7 U.S. based customer support to help customers with any questions they might have or to provide solutions for clients having technical problems. So whether you have a question at 8:00 PM or at 3:00 AM, you can expect a Bluehost representative to assist you when needed.
- BlueHost has an impressive track record with an uptime average of 99.9%. More uptime means more reliability and stability within your website.
BlueHost is also extraordinarily easy to use, as you will soon see below. They have simple one click solutions to help you build your website without having to know all the technical geeky stuff.
Bluehost has actually been recommended by WordPress to use as a host since 2005. It is currently number one on their list of recommended hosting providers.
Set up your Bluehost Account
An actual website is just a bunch of files. All of these files need to be put somewhere on a server to be connected to the Internet. This is where Bluehost comes in.
First, however, you will need a domain name. A domain name is simply the address or URL for the website, like http://www.google.com. Luckily, Bluehost provides a domain name for free so you don’t have to worry about extra costs when registering one. If you already have a domain name, don’t worry, I’ll cover the steps for setting up a Bluehost account with a domain name from another provider as well.
However, it is important to note that your domain name must be unique! You cannot have the same domain as someone else on the internet if it is already taken.
Now, let’s get started.
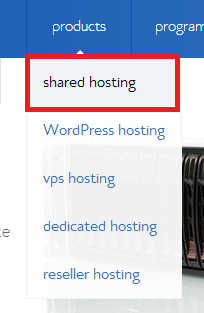
Upon visiting Bluehost, hover over the “Products” tab at the top and click on “Shared Hosting” as depicted in the image below.
This should take you to the page https://www.bluehost.com/shared where you can start signing up for your website.
Next, scroll down to find the cheapest available service plan that starts at $4.95 per month. At the bottom of the table should be a green “Get Started” button that looks like this:
Go ahead and click that button to begin the sign up process for your website!
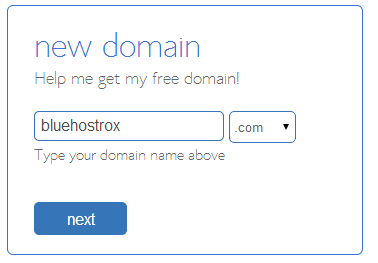
This will take you to the first sign up page. If you haven’t registered a domain name with another provider already (e.g. Register.com) then go ahead and type in the domain you wish to have in the box that is titled “New Domain.”
In this example, I will register the domain name www.bluehostrox.com.
Note: You can also change the extension of the domain by clicking on the box to the right labeled “.com” to whichever suits your website the best.
Click “next” to proceed to the next step. If you try to type in a domain name that has already been taken, Bluehost will give you numerous alternative domains to choose from that are currently available for use.
Once you have successfully found a domain that is unique to you, the next page should look like this:
On this page you will fill in your account information on the forms below which will be used for billing and records. It is important you use factual information in case of any emergencies such as forgetting your password.
It is important to note that Bluehost customers are required to pay the annual rate in advance. This is how Bluehost is able to offer such competitively low prices. Looking towards the long run of your website, you will be saving a tremendous amount of money by using Bluehost.
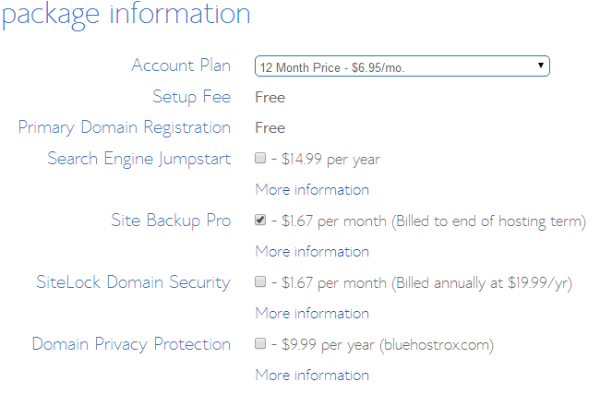
The only optional feature I would recommend adding to your website is the “Site Backup Pro.” This will give you a greater peace of mind when managing your website. It will automatically back up your site in case it gets hacked, or in case you lose old data that was accidentally deleted. Any other optional features should be left unchecked unless you feel they are a necessity to your website. If you followed my example, your package information should look like this:
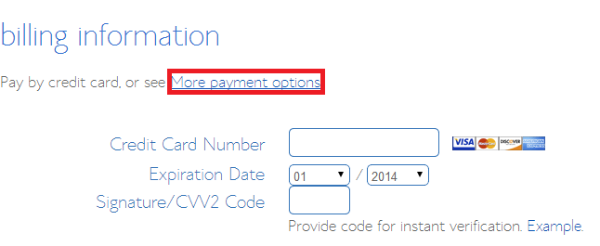
After you finish selecting any additional options you wish to add, input your billing information to process the payment. Bluehost accepts credit card payments and also Paypal payments. Click the “More payment options” link as depicted below to see all the available payment methods. Bluehost has a very secure server through which your money gets processed so you don’t have to worry about any sensitive information being stolen.
You will then be prompted to a page that will allow you to sign up for additional “upgrades.” You do not have to sign up for any of these extra services if they do not apply to you. I recommend skipping this page if you are new to setting up websites. Skip down to the bottom of the page and click on “complete.” Your “Additional Upgrade Total” should be “$0.00” if you have not selected anything:
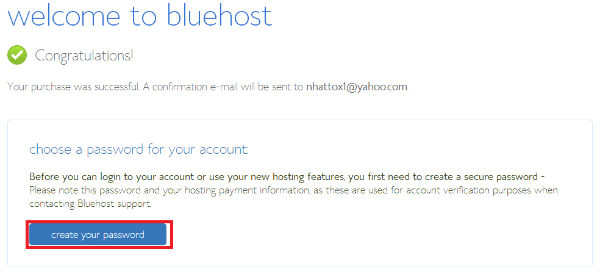
If your billing information goes through the system successfully, you will be directed to a page that looks something like this:
An email will be sent to you regarding your account information. Before you can access your account, you must create a password by clicking the blue “create your password” button highlighted in the image above.
Bluehost requires you to have a lowercase letter, an uppercase letter, a number, and a symbol in order to ensure that your password is secure. You must also type your password in twice in the two boxes to verify that you aren’t typing anything incorrectly. Depending on how secure your password is, Bluehost will give it a rating from “Weak” to “Excellent.” It is recommended to create a password that reaches the “Excellent” mark as shown below:
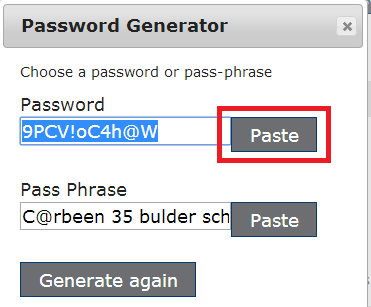
You can also use the “Password Generator” button to automatically generate a secure password. These passwords usually consist of random characters together, so it is important to save them somewhere secure to remember them. To use passwords created by the password generator, simply click the “Paste” button next to the password you wish to use.
This will automatically input the password for you into the two fields. It is important you copy this password beforehand and save it on your computer, or write it down somewhere for your own personal record.
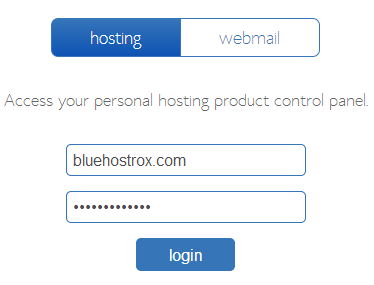
You’re almost there! Now go ahead and login to your account. Your domain name should be already set up in the first input box, but if it isn’t, go ahead and type it there. The password will either be the password you put in yourself, or the password that was generated for you by Bluehost.
After logging in you’ll be prompted by another upgrade offer. Click the link that says “No thanks. I’m not interested,” to skip to the next page.
Set up WordPress
After successfully creating and signing into your Bluehost account, you will be redirected to your hosting’s control panel. Here you can access all the features of your website, including WordPress.
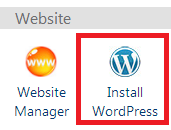
Bluehost has a convenient one click WordPress installation that is very user friendly and easy to follow. Under the section that is labeled “Website,” click on the icon that reads “Install WordPress.”
This will tell you it’s loading up your Mojo account. Mojo is simply a system through which the site can run automated scripts. Don’t let this confuse you, as it will simply redirect you to a new page where you can begin your WordPress set up.
Once you’re at this page, click the green “Install” button to initiate a new installation of WordPress on your website.
A prompt should appear with the option to “Select which domain you would like to install to.” It should automatically be selected to the domain you just set up. If you’d like to install it on your main directory, then do not change the value that is labeled “directory.” If I were to do this for my example website, then when a user visits my domain, http://bluehostrox.com, it will automatically take them to the WordPress site that I am currently setting up. Setting up a directory however, will put the WordPress site in another folder within your domain. For example, if I want my WordPress site to be at http://bluehostrox.com/taco, then I would input “taco” into the field that is labeled “directory.” For this example, however, I will leave that field alone.
After clicking “Check Domain” the system will go through a check to verify everything goes through correctly.
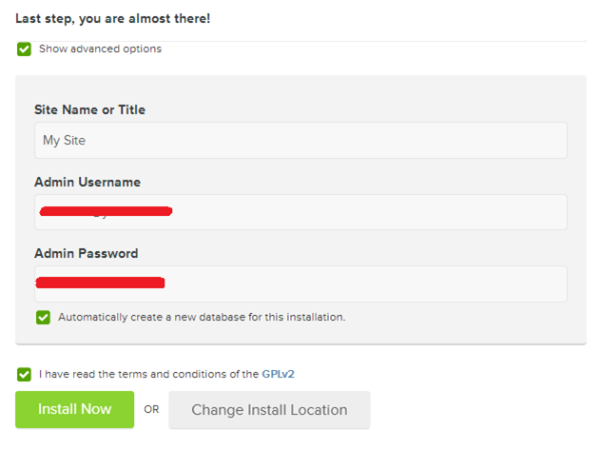
At the next step, you will be prompted to read the terms and conditions and mark that you have read and understood them by clicking the check box beside it. You can also configure some optional features in advance to your WordPress site before it is set up by clicking on “Show Advanced Options.”
On the “Show advanced options” tab, you can configure your website’s title. For example, if you were creating a personal blog, you could make it something like “My Personal Blog.” Note that this can always be changed in the future.
Your admin username and password is what you will be using to access your WordPress control panel. It is important to note that this is completely separate from your actual hosting’s control panel. It is entirely up to you whether or not these login details are the same as your hosting account, but they do not have to be.
After you’re done setting up your new username and password, click on “Install Now” to begin the setup.
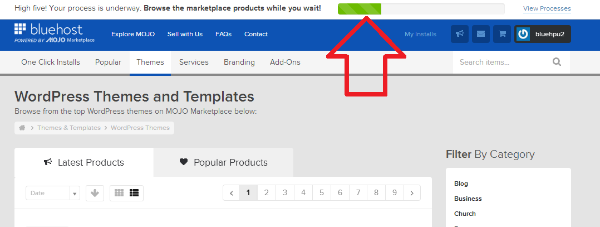
The next page will bring you to a catalogue of different WordPress themes to browse through while your website is being set up.
You should see the progress of your website as indicted by the red arrow above. As for the catalogue, I would recommend ignoring those products until you have your site fully configured.
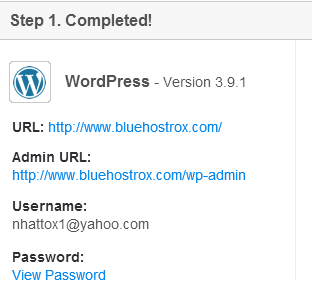
Once WordPress is completely installed, you will get an email notification regarding your account details.
Here you will be able to see where you set up WordPress and the credentials to your username and password. Your blog should be live by now and you can access it by clicking on the link by “URL.” Here you will see a generic page where your website is currently running. WordPress uses a generic theme by default, but there are THOUSANDS of themes you will be able to choose from.
To login to your admin panel, click on the link below “Admin URL.”
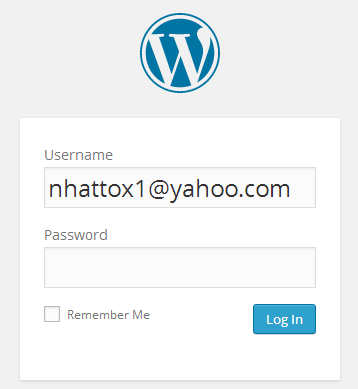
This is what your login screen should look like for the admin panel. Input the username and password you previously set up for WordPress to login.
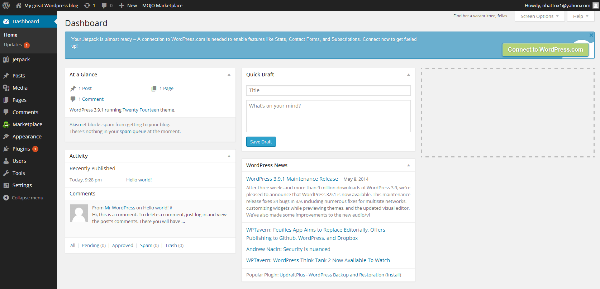
If your login is successful, you should be redirected to a page that looks like this:
Congratulations, you’re in! This is the admin panel where you will be able to completely configure your WordPress settings, post blogs, edit pages, upload plugins/themes, and much more!
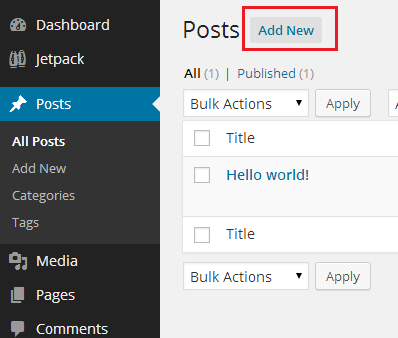
For getting started, let’s add the first post to our new blog. In the control panel, click the “Posts” tab on the left hand navigation
Click the “Add New” link either on the left hand navigation or on the main content as highlighted above.
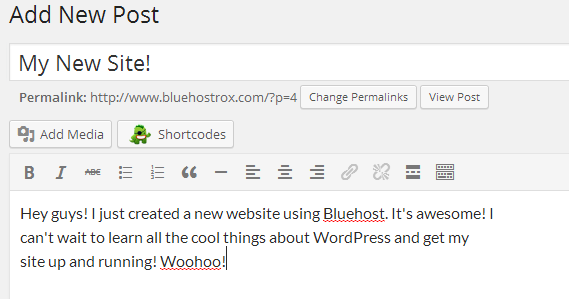
Here you can add a new post by entering the title of the post followed by the post itself on the field below. Here is my example post:
After you’re done, click the blue “Publish” button on the right hand side to publish your post.
Your post should now be viewable on the front page of your website!
There’s so much in WordPress to do and learn, but don’t fret! WordPress makes running a blog or website very easy and user friendly. Feel free to check out these recommended sites for tips and tutorials on how to manage and run your new WordPress website:
These websites will teach you various things about setting up your site such as creating pages, setting up menus, and installing themes.


