Getting the perfect image for your blog takes a long time. Longer than a lot of people realize.
But you’ve read the blogs, you know the statistics: Images keep your readers engaged and interested. You simply can’t go without images.
And if you’re anything like me, you’re probably including quite a lot too.
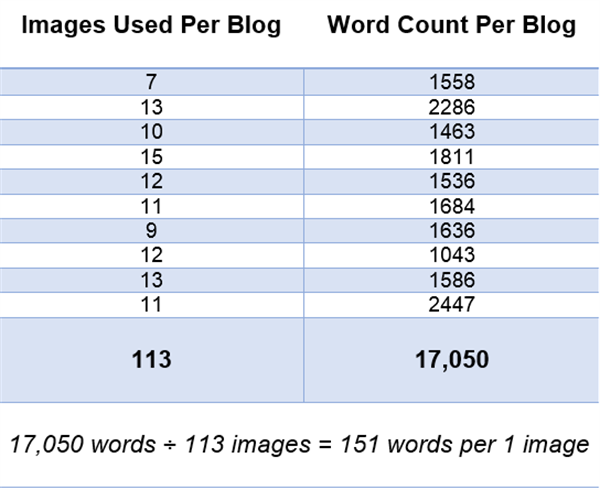
In my last 10 blogs, the fewest images I’ve used (excluding embedded tweets and videos) is 9, and the most I’ve used is 15. That means that on average I used 11.3 images per blog. In those last 10 blogs, my average word could has been 1,705 which means that for every 151 words I used 1 image.
Here’s a nerdy graph that I made of my findings:
First of all, I have to disclose that I’m able to save a lot of time because of the Flickr feature that Spokal has in its Editor. If you use Spokal, I know you’re nodding knowingly right now. If not, let me fill you in:
Spokal has a “Flickr” tab in its editor. All I have to do is click on this tab, search the image (all the while I’m still in the editor), look through the images that are returned to me until I find the perfect one and then I drag and drop the image to where I want it in the editor.
Then all there’s left to do is edit it (if the license allows, and I want to) and put my keywords in the alternative/title box.
I don’t have to look for the license, I don’t have to get the name of the creator and I don’t have to get the original source for the image – Spokal does that all for me.
Sooo… That may be the reason I use so many images in my blog: It’s easy!
However, Flickr doesn’t always cut it. And I do write on a number of other blogs, and none of them use the Spokal platform unfortunately.
In order to be able to save time, be productive while also delivering awesome blogs with interesting images, I’ve had to learn how to streamline the process to get the perfect image, and I’ve gotten it down to under 4 minutes!
Let me show you how.
Sourcing the Perfect Image Quickly Starts with Preparation
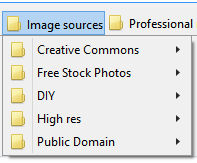
Before you can easily and quickly source the perfect images for you blog, you need to organize your image sources so that they’re easily accessible.
This is a one-time ordeal, so just buckle down and get to work!
Now go to your favourite image sourcing sites. Check out The Ultimate Guide to Sourcing Free Images for Your Blog for some tips on where to go.
When you’ve gone to the website, make sure that you’re on the page with the search bar. Then simply bookmark that page into the appropriate subfolder. Try and get at least one site in each folder for now. Public domain photos aren’t super important right now, but they’ll come in useful eventually.
Done? Perfect! You’re organized and ready to go!
Step 1: What Kind of Image Do You Need?
~ 30 Seconds
The first step is assessing what kind of image you need for your blog.
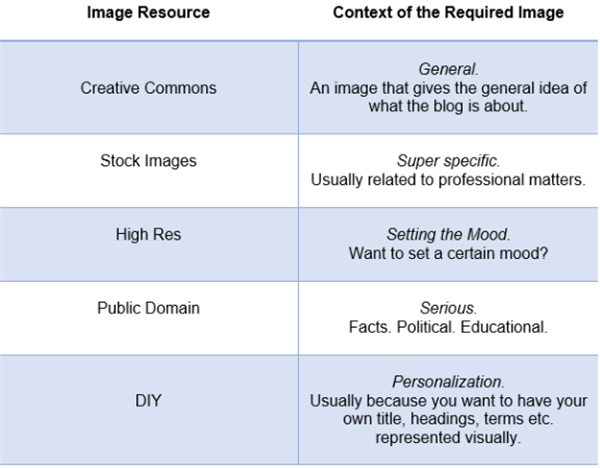
In general, you’ll be using creative commons the most, then stock images, and then High Res/DIY and finally, public domains.
Only use stock images if creative commons just won’t do. Stock images are a little boring and overused, and they’re only effective if they help support the understanding of the reader.
Basically: They’re not interesting enough to use as a way to keep your reader engaged, so only use them if they’re supporting an idea that you’re discussing.
For example, it might be hard for me to find a creative commons image that represented the idea of “keyword” or “SEO”, and that’s where I’d go to stock images for.
Step 2: Searching for that Perfect Image
~ 15 seconds
Once you’ve decided what kind of image you need for your blog, go to your bookmark toolbar, choose your image bookmark and go to the appropriate sub-folder.
I have a favourite under each sub-folder.
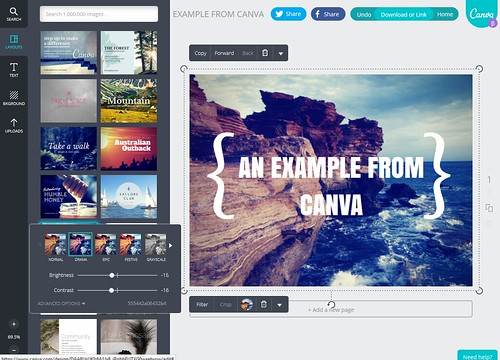
For creative commons, I love the Creative Commons Search because it gives me access to a few different resources all in one place. For stock images, I love Free Digital Photos. For high resolution images, it has to be Unsplash, and DIY it’s Canva (unless I’m making an infographic type thing, in which case it’s Easelly. Oh and for public domains I simply can’t muster up that much excitement, but I always head to U.S. Government Photos and Images.
Choose your favourite image source that you think you’ll find your perfect image in and click on it. If you’ve bookmarked correctly, the search engine should be right in front of you.
Search for your image using a noun, adjective or verb, maybe even two. But keep it simple. No long tails needed here.
If you’re writing about how to distress after work, then search “chiropractor” (noun), “massage” (noun and/or verb) or “relaxed” (adjective). If you’re writing about how to deal with stressful customers, search “customers” (noun) or “stressed” (adjective).
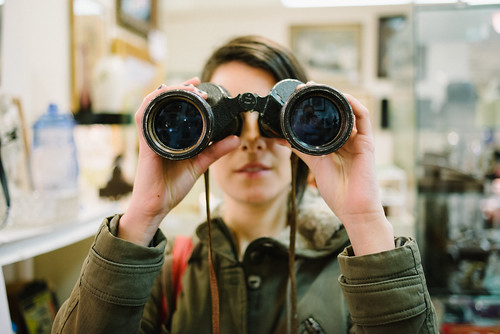
For the image for this section of the blog I thought about what do you commonly see used when searching for something, I then searched “binoculars” and there you have it!
Step 3: Choosing the Perfect Image
~ 1 minute
I’m a big believer in instincts, and finding the perfect image is one of those times you can try to work on yours a little bit.
If an image is sticking out to you, chances are it’s because it’s the perfect image for you blog post.
To make sure that you’re image is just right, ask yourself two questions:
- Does this image make sense in the context I need it for?
- If yes: Did the image catch my eye for the same reason it might catch anyone else’s eye?
The first question is an obvious one, you have to make sure the image works with the blog post. If a picture of a donkey shows up when you’re searching the term “customers”, it probably caught your eye because it’s out of place, so you don’t want to use it.
The second question is a little less obvious, but even more important. Think about why the picture caught your eye. If it’s a general reason like “it’s bright”, “it’s funny” or “it’s interesting”, you’ve got yourself a winner.
However, if it’s something that’s specific to your experiences, such as “because I have a Corgi”, then it won’t apply to everyone. The perfect image is one that’s interesting to everyone, regardless of their experiences.
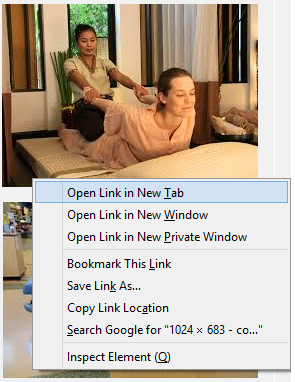
If the answers to the two above questions are “yes” then right click on the image and open the link in a new tab.
It’s important that you don’t actually click the image itself for 2 reasons:
- When you see the full sized image, you may notice something about it that you hadn’t in the thumbnail. If this is the case, all you have to do is “x” out of the new tab and go back to your original search. This saves time on pressing the back button and having the search reload from the beginning.
- If you need to source more than one image (which you probably do), right clicking the image and opening it in a new tab leaves the search bar open and ready to search more images in. Again, there’s no going back, there’s no reloading and there’s no fixing up your filters – It’s all set up and ready to go.
Step 4: Download & Save
~ 15 seconds
When downloading/saving the image, save the image where you can find it again, don’t just leave it in that huge “downloads” folder where things go to get lost. I have a folder for each blog I write, so I save the images relating to each blog post there, and they’re super easy to find if I ever need to again!
When you’ve been writing for a while, you’ll find yourself wanting to locate the same image for different contexts. This is where saving smartly comes in handy.
Of course, if you don’t, then you can go to where the image was used initially and save and download from there, but that takes a little bit more time.
At this point, leave the page where you found your image open.
Step 5: Insert Image into Post
~ 15 seconds
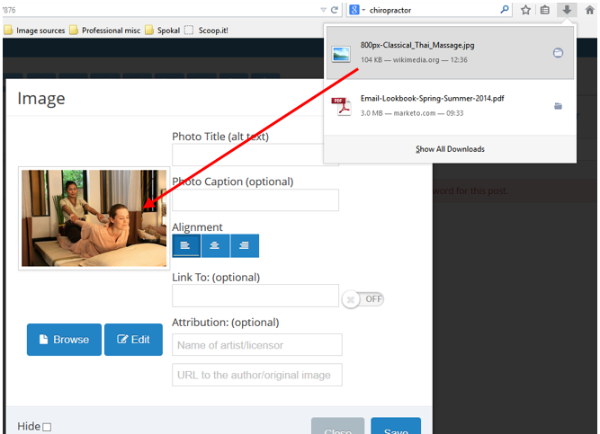
If you’re using Chrome or Firefox, there are shortcuts to inserting your image into your blog post.
Of course, if you want to click “browse” and go through all your folders and sub-folders to find the correct image, go ahead.
Or, you just drag and drop the image from your download bar to your media library.
Firefox’s download are beside your address bar like so:
And Chrome’s is a noticeable bar on the bottom of your screen.
And if you’re still using Internet Explorer… Well, uhm…I’m sure you can figure that out for yourself.
Step 6: Image Attribution
~ 1 minute 30 seconds
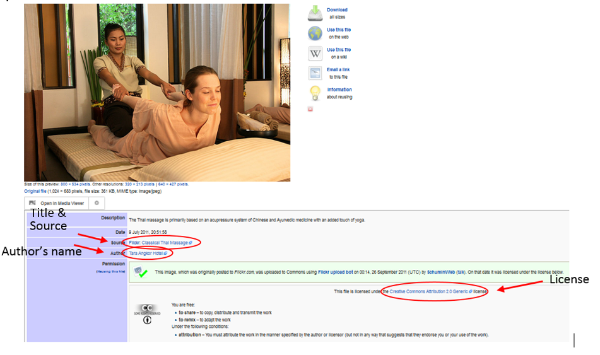
The perfect image needs the perfect image attribution, but attribution can take up a lot of time. To attribute correctly you need four pieces of information:
- The image’s title
- The image creator’s name
- The source of the image (ideally, the original source but if it’s not available, you can attribute the source where you located it in)
- The license
That’s four different pieces of information you have find. But don’t worry, they’re all easily available on your image’s page.
Of course, there are a lot of sites that don’t attribute correctly (or the images actually belong to the page itself), in which case, you won’t find the sources, author’s names and licenses there.
Unfortunately, you can’t legally use images if you can’t attribute them correctly.
However, all of the sites that I have mentioned in this blog post and on the Ultimate Guide blog post can all be easily attributed.
Where to find attribution details
This example is taken from a Wiki source, but you’ll find the same details on most reputable sites – It’s just about getting familiar with the layout and where the information is located.
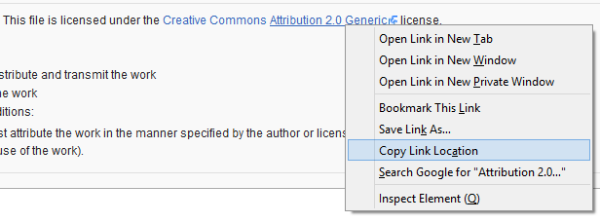
Now, before you go clicking all those links and opening a whole bunch of pages, don’t.
Instead, right click on the link and simply select “copy link location”.
After you’ve selected this, paste it into the appropriate area in your image attribution. Repeat this for each required link and copy and paste the author’s name and the title of the image and tada! Image attributed!
Bonus: DIY Images (10 minutes+)
Obviously, DIY images take a little longer because you’re making them yourself.
However, you do get to skip all the attribution part as long as you just use your own work!
You can also use some images that have absolutely no license attached to them, such as Unsplash’s high res pictures, or by searching for images that have a “Sharealike” license and attributing the original author.
I try to include at least one DIY image in each post. In this post, I’ve included 7, all of which are instructional screen grabs so they weren’t time consuming. However, usually I spend 10 – 15 minutes creating a nice graphic based on useful tip, a heading, the title of my post… whatever I can think up!
If you’ve got any other tips to speed up the process for finding the perfect image for you blog post, any questions about the process, or if you just want to say hi, feel free to leave a comment and I’ll be sure to get right back to you!
Like this post?
Subscribe to get some an A-Z guide of online marketing terms AND we'll give you 3 guides to get you started with online marketing, and 3 bonus templates to make creating content easier.
