We all know that content marketing – and more specifically, blogging – works. It works really well. Consider a few statistics:
- The average company that blogs generates 55% more website visitors than companies without a blog on their sites.
- Blogging generates 97% more inbound links to a site and 126% more leads.
- What’s more, blogging gets you 434% more indexed pages in search engines – that’s more chances for you to get found by search users.
With all that goodness right there for the taking, why are so many marketers and business owners struggling to create enough content to build some momentum and make an impact?
And folks, we are struggling. Tea Silvestre of Story Bistro conducted a survey a few years back. Over 1,000 respondents were asked what their biggest marketing challenge was. Number one with a bullet, at 40%, was time management.
And in another study, 51% of B2B marketers said a “lack of time/bandwidth” was their biggest challenge to producing enough content consistently to achieve their marketing goals.
So, clearly we’ve got a problem here, and a lot of us are still looking for solutions.
We can’t devote days out of each week to content marketing. We’ve got businesses to run. Content marketing isn’t our job – it’s how we get more clients and customers. In short, it’s what supports our job and our livelihoods.
We need a faster, better way to get content published on a consistent basis without sacrificing quality. (Let’s face it, if it were just a matter of publishing more often with less time required, we could mash together any random thoughts and put it out there for the world to see.)
Luckily, that’s just what Spokal has for you here in this very article. Read on!
Use a Template
There are just a handful of basic blog post types:
- List post
- How-to
- Profile
- Essay
- Review
- Interview
- News/Newsjacking
How does this information help you? Simple: Templates.
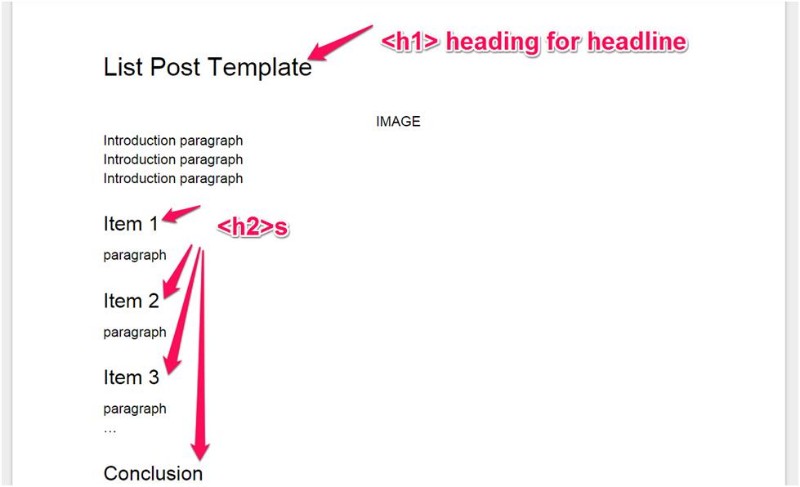
A template serves as a skeleton or frame for a specific type of blog post. It doesn’t have to be terribly complex or pretty. For instance, if you write a lot of list posts, your template could be as simple as this:
Or you could create one that’s more complex, with placeholder text for supporting data, bulleted lists, etc. Whatever kind of template you choose to use, it’ll help you save time.
Take an hour in the next day or so and create a template file in whatever you use to compose your blog posts (more on that in a bit) for each of the post types you publish on your site.
When you’re ready to write, simply open the template, save it as a different filename, and follow the framework.
Understand the Phases of Content Creation
There are also a handful of phases in creating any kind of written content, including blog posts:
- Idea generation
- Outline
- Research
- Draft
- Revise/proof
Each of those phases gets its own section in this post, but I mention it here for a specific, albeit somewhat preliminary reason: If you do one kind of task in one small time period – say an hour or so – you actually end up working more efficiently and saving time.
That’s because chunking your tasks together this way prevents one of the biggest sources of time drain in your workday – the time it takes you to switch between tasks.
Chunking, as it’s called by many, is so powerful that it’s the foundation of a famous productivity approach: the Pomodoro Technique(R). The basis of Pomodoro is pretty simple – you work diligently and with focus, but only for a 25-minute chunk of time, then take a 5-minute break. Every two hours, you take a longer break.
How does this apply to blogging? You chunk your tasks under each phase, then take a break.
So instead of researching and writing and looking for images over the course of two hours, you’d instead get your research done first, before you move on to writing, which you’d complete before you look for images. Switching back and forth between tabs with different purposes will only slow you down.
Focus on one phase at a time, and the time it’ll take you to complete each phase will decrease.
Write Down Ideas – Lots and Lots of Ideas
Ideas are cheap. There, I said it. They are even cheaper than a dime for every dozen.
Where they become invaluable is when you lose them. And you lose them by not writing them down.
We have ideas all the time, in almost any location or doing almost any activity, throughout the day. The problem is that all too often, we don’t write them down in time. And by the time we get to a convenient time or place, we’ve completely blanked on what that awesome idea was in the first place.
But it’s OK. Remember, ideas are cheap.
Stop the brain drain by adopting one method for keeping a monster list of all your ideas. The list needs to be in one place, and it needs to go with you everywhere, so you can add to it whenever the next idea hits you.
Evernote works beautifully for this purpose and is the most-often recommended solution. It’s cloud-synced, and it can be accessed on any machine – PC or Mac, desktop or tablet or laptop – as well as on your smartphone.
You could also use a nice (or cheap) notebook and pen if you’re more an analog fan. Just make sure you take it with you everywhere.
Be over-inclusive with your list. Instead of stopping yourself from writing down a new idea because “that’s stupid” or “it’s overdone” or “I don’t have anything new to add to that topic,” put it on the list. You can always edit later.
And if you’re still not sold on the whole “ideas are cheap” thing, and feel like you need some help coming up with the ideas in the first place?
- Try Portent’s content idea generator.
- Brainstorm for thirty minutes or so.
- Browse through comments on blogs – your own and others – in your niche. What questions are people asking? What do they want to know?
- Use Twitter to ask people what they want to know about your niche or industry.
- Challenge yourself. Pick ten objects in the room you’re sitting in and try to come up with two different ways to relate each object to your niche.
- Take a break. Caleb Wojcik, co-founder of Fizzle, says “great ideas come when you aren’t trying to think of them.” So if you’re feeling stuck, wash the dishes or take a walk around the neighborhood.
Create an Editorial Calendar (Yes, We Mean It)
Creating an editorial calendar – as advice it’s become so oft-repeated it’s starting to generate the inevitable backlash. Here’s the thing, though: It actually works.
The concept originates from the world of print magazines. Since magazines have to be put together months in advance (as anyone who ever watched The Devil Wears Prada knows), editorial departments put together the EC to keep track of content as it’s being developed.
The EC works just as well for smaller publications, such as your blog. You’ll find it much easier to keep track of your content and be more purposeful and strategic about it.
But the EC does not have to be crazy-complicated. So don’t sweat this. Any format will work – even a straight-up plain text doc saved to your desktop, or sticky notes on a big wall calendar.
If you’re looking for something with more bells and whistles, though, check out this mondo list of editorial calendar templates from Curata with links for downloads.
Try to choose a mix of content types for each month, and decide up front how often you’ll publish. It’s more important to be consistent than to be frequent. So a post every day for ten days, then nothing for 20 is way less effective than a post every week.
If you’re a Spokal user, you can plan your content using the editorial calendar feature.
Gather the Necessary Tools
It’s really not a good idea to compose your posts in the WordPress “add post” window (or whatever the equivalent for your blog is). So one of the first and most important tools you need is a word processing app or similar solution.
A lot of people use Word, and there’s nothing wrong with that if you’ve got access to the program, know how to use it, and find it user-friendly.
If you don’t have access to Word, you don’t know how to use it, or you don’t find it user-friendly, Google Docs is a solid choice. It’s free and cloud-based. Since you can access it in the browser and use the same set of keyboard shortcuts and hotkeys, you’ll save some time during the research/note-taking stage. You can also share work with team members, and download your file in different formats (good for guest post submissions to blogs that ask for Word files).
The downside is that it’s not a full-fledged word processor, so you won’t enjoy all the functionality as you’ll get with Word. However, it does provide what most bloggers need in terms of styles and formatting.
However, if you’re looking for something truly special that’s made just for writers, check out Scrivener. It’s not free (though at $40, it’s not terribly pricey either), but it’s packed with features that help writers of all kinds – bloggers included – manage their work files by projects.
You also need sufficient screen space. When I moved from a 13” laptop to a desktop with a 24” monitor, I found my writing productivity increased significantly. I simply opened two browser windows – one for Google Docs, one for research – and narrowed both windows to take up half the available width of the monitor, then positioned them side by side. That makes it super-easy to switch back and forth without losing my place.
It’s also helpful to have a screenshot app that lets you make annotations on your screenshots easily. I like Skitch (that’s what I used on the screenshots in this article), which also has the bonus benefit of integrating nicely with Evernote, but many swear by Monosnap.
You may want to take the extra step of blocking sites that you frequently use as distraction bait with a tool such as AntiSocial or Cold Turkey, if you prefer a downloadable app and use Windows.
Have you heard of Parkinson’s law? Even if you don’t know it by that name, you probably are aware of the law’s operation in your life: Work expands to fill the time you allot to it. Set aside half an hour – it’s done in thirty minutes. Set aside an hour – suddenly the same task you got done in thirty minutes now takes sixty.
You can take advantage of Parkinson’s law by setting a timer. It creates a sense of urgency, so you work faster to beat the clock. Just make sure you pick a reasonable time block to begin with; unless you’re a legitimate superhero, you’re not going to start and complete a 3,500 word count blog post in 20 minutes.
Get the Easy Stuff Out of the Way
When you have your topic ready to go and you’re ready to start writing, knock out the preliminaries first: your headline, your introduction, and your conclusion.
There’s a reason to start with these three elements of any post. They form a wrapper of sorts for the meat of your post. Because they’re relatively small chunks, you can ease into the writing process (important if you’re feeling a little intimidated and under pressure).
Start with a working headline. This will help you keep focused on your purpose for the post itself. You’ll probably end up revising it, and that’s OK. But starting with the headline is a way of tagging the destination for your journey.
Your headline is a promise that you make to your readers. You have to keep that promise in the body of your post. So writing the headline first – even a rough, preliminary one – helps you stay on track with the rest of your work.
Next, write your introduction. It doesn’t have to be long – and, again, you’re going to revise and edit your first draft, so it doesn’t have to be perfect, either. State your topic, why it’s important to your targeted readers, and how you’re going to help those readers solve the problem presented by the topic.
Here, you’re just sketching out a game plan of where you’re going with the article that follows. Create a scenario that invites your readers in. That’s how you show them you know what their problem is and how to solve it.
Finally, write your conclusion. Ultimately, you want a conclusion that inspires your readers to take some kind of action or challenges their beliefs or thoughts, not (just) a boring summary of what you said in the post itself.
One way to spice up your conclusion is to hold your best, most effective tip in reserve. Don’t even mention it in the body of the post at all. Save it for the conclusion.
Add some encouragement and authentic reassurance. Hey, you’ve been where the readers are now, you know what it feels like, and most importantly, you know how to get them out of that place and into a better one.
Then close with a call to action. That can be anything, really, but it should ideally be something that furthers a business goal. Examples include things like signing up for your email list, leaving a comment, sharing the post, and adding their own tips or advice either in the comments or on social media.
Create an Outline
Yes, outline comes before research. That might seem weird – and totally backwards from Mrs. Westinghaus’s instructions in freshman English Comp (I’m sorry, Mrs. Westinghaus, truly) – but if your goal is to create blog posts more quickly, it’s absolutely the right way to go.
I’m not talking here about those formal, classical outlines we learned in school – you know, roman numerals for Big Important Ideas, capital letters for subtopics, numbers for details, and if you have an A, you better have a B. That’s not what we’re after.
This kind of outline is strictly for generating ideas and creating placeholder text to help you get a general idea of the post’s structure. It also helps you pinpoint the places where you do need a little more research, either to double-check your opinions or to flesh out an idea with specifics where you might be a little fuzzy on the details.
Your outline doesn’t have to be written in complete sentences, and it doesn’t matter if it’s rife with bad grammar or spelling mistakes. However, it should flow logically from one idea to the next, and it all should give you a better picture of how, exactly, you’re going to deliver on the headline’s promise.
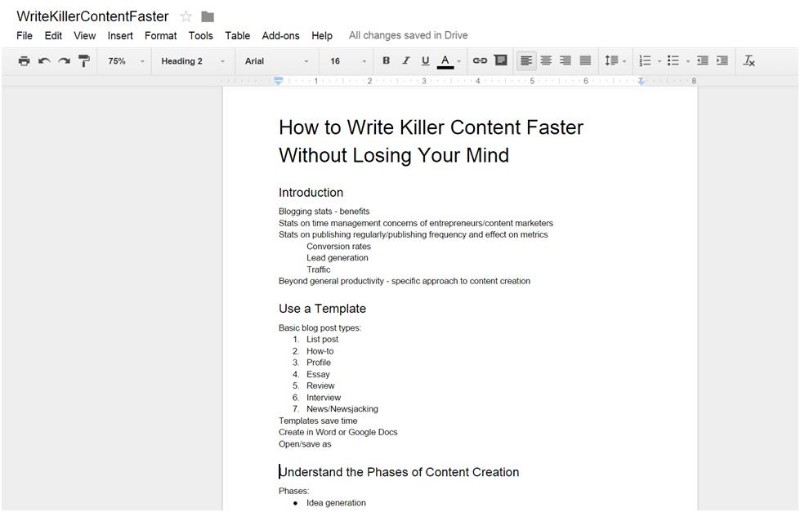
To give you a better sense of the post outline process, here’s a screenshot of my outline for this post – the one you’re reading right now:
So you can see it’s not some scary, complex process. It’s just notes, basically, but in a logical order.
Include every major subtopic and detail you can think of off the top of your head. If a question occurs to you, put it down where you think the reader will also have that same question, or where it makes sense to answer it. You might want to format your questions differently from the rest of the text (i.e., different color or italics), so you can quickly find them while you’re researching.
Although they may be frowned upon in presentations, bullet points are excellent for blog posts! They help your reader scan the post (which they’re going to do anyway) and quickly grasp your main ideas.
You can list steps, key takeaways, major ideas, points in a supporting argument – basically anything that could be written in a sentence or paragraph and separated by commas or semicolons could lend itself well to a list.
Finally, consider adding a bulleted or numbered list at the end of your post of the key takeaways for the entire post. For the right kind of post – instructional/how-to’s in particular – that helps your reader process what they’ve just read and take action on your advice.
Research (Only) As Much As You Need To
Research presents a significant challenge to a lot of writers. For others, it’s a piece of cake. For still others, it’s just an opportunity to play Candy Crush on Facebook.
Set your timer for your research “chunk,” and before you dig in, review your outline. What, exactly, are you trying to find out? Limit your searching to specific queries aimed at those details only.
For instance, I could have taken hours to research this post if I’d used a search query like “write blog posts faster.” (I just tried that search. 18,000,000 results. I’d be reading until Christmas next year.)
Instead, I only searched for the things I needed to double-check, or specific points I needed some data on:
- Current statistics on the effectiveness of blogging for business purposes
- Double-checking URLs of some of the tools and programs I’ve mentioned
- Finding a good quote for the conclusion
Be smart about search. For instance, if you’re looking for academic or scholarly articles, use Google Scholar. Or use advanced query techniques – for instance, if you need to limit results to a specific site:
inurl:spokal.com productivity
Another nifty little research trick is to use Google Image search and look for infographics. Typically, infographics are built around data and statistics. If the designer did their job correctly, they’ll cite the source somewhere in the infographic itself or on the page where it’s published. You can then use Google to verify and get a link to cite in your article.
Fill in the Gaps
Once you’ve completed the research necessary to answer your specific questions, it’s time to write. And here’s the beauty of this particular phased process: If you’ve done the previous steps relatively well — especially the outlining part — it’s basically a matter of filling in the blanks at this point.
One key to making this work: Don’t write and edit at the same time. First and foremost, editing as you write slows you down tremendously. Editing and writing require two completely different skill sets, so you end up having to switch gears as you switch tasks. Added up over the course of a lengthy blog post, that can mean an extra thirty minutes that you could have saved.
So write first. Edit later. If you get anxious about the quality of what you’re writing in this “draft” stage, keep telling yourself you’ll fix it in the edit. Insert a comment or highlight if you’re afraid you won’t remember that a specific section needs work.
Finally, you’ll want to include images. The whole process of image-finding for blog posts can be a deep, dark rabbit hole all by itself, so be selective here. Set a timer – say, 10 to 20 minutes – and use sites that you’ve used in the past, so you’re familiar with the product and know you can legally use the images.
Guess what? You’re over halfway there.
Revise & Proof in That Order (No, They’re Not the Same Thing)
Revising (editing) and proofreading are not the same thing. The former is about style, structure, and sense. The latter is about catching errors – typographical and grammatical, usually. And you want to start with editing your piece. Start with the big picture, then work down to the level of details.
Marshal D. Carper suggests the bulk of your time should be spent on revisions – 45% of the total time, in fact, far more than the other phases. As he points out:
- Most writers spend far too much time in the drafting stage, trying to write the perfect manuscript on the first try.
- Most writing magic happens in revision, so your time is best spent there.
Start the process by checking your draft against the headline. Remember, that headline makes a promise – does the post you just wrote live up to that promise? if not, rework the headline or rework the post until it does.
Did you say what you wanted to say, the way you wanted to say it? Is your reasoning clear? Are there passages that could be shorter and more succinct? Conversely, did you gloss over something you should really take some more space to expand on and explain more carefully?
Do you assert opinions that could be supported by more data? Or did you put in too much data, leaving the post as dry and flat as the Sahara?
After you’ve revised your post, take a significant break – at least an hour, but a day if possible. We already learned above that revising is the bulk of your writing job (45%), so it makes sense that finishing that task leaves you a little drained. And that’s not a good time to be doing any detailed fine-tuning on your work, which is exactly what proofreading is.
If at all possible, it’s always better to have someone else proof your work. If you have a team, you’re golden – simply proof each other’s work as part of your process. If you’re a solo, that’s OK – look around for another blogger who might be willing to trade off proofing duties for each other’s posts.
In a pinch, you can absolutely proof your own work. But make sure you do it when you’re well-rested and attentive, and after you’ve taken a sizeable break. Even the very best writers go a little word-blind to their own work, and that’s especially true immediately after writing it.
If grammar and style really aren’t your thing, bookmark these source posts and sites for editing and proofing help:
- Write to Done: Get Your Eagle Eye On: 10 Tips for Proofreading Your Own Work
- Daily Writing Tips: How to Revise, Edit and Proofread Your Writing
- Simple Writing: 25 Editing Tips for Your Writer’s Toolbox
- The Hemingway app – a web-based tool that helps you spot problem areas in your writing (I use this one myself quite a bit)
Conclusion
Last but not least, use this process – or one you create yourself, if that works better for you – to create a content-writing habit.
Habits are powerful things. They propel us in a certain direction almost automatically. We’re certainly far more creatures of habit than we are creatures of logic.
What’s more, the writing habit actually increases creativity. Turns out, it’s not a case of “more creativity making you a more productive writer” but rather “being a more productive writer increases your creativity.”
As Charles Duhigg wrote in his bestselling book, The Power of Habit, “Change might not be fast and it isn’t always easy. But with time and effort, almost any habit can be reshaped.”
Got a super-effective trick or tip for getting more content published that we didn’t cover here? Share your best advice in the comments below!
